The most repeated advice about Reels format size is also the least complete: export at 1080 × 1920 pixels and you're done. That canvas is the correct starting point, but it doesn't guarantee that viewers will see your headline, product, logo, or call to action. Instagram places controls, captions, usernames, and other interface elements over the video, while different surfaces can crop the same asset in different ways.
A Reel can meet every headline specification and still lose clarity in the first seconds because the hook sits too low, the logo disappears under controls, or the cover crop removes the subject. The practical standard is therefore 9:16 dimensions plus placement-aware design. This guide covers the technical baseline, safe areas, alternative ratios, export decisions, and a production checklist you can use before every upload.
Why Reels Format Size Is About More Than Dimensions
The useful question isn't just, “What size should my Reel be?” Ask instead: What remains visible after Instagram places its interface on top of the video? That change in perspective affects every production decision, from where you position a presenter's face to where you place a price, subtitle, or CTA.
Instagram Reels use a native vertical canvas of 1080 × 1920 pixels, or a 9:16 aspect ratio, designed to fill a smartphone screen in portrait mode. Buffer's Instagram image size guide also notes that Instagram accepts uploads from 1.91:1 through 9:16, with a minimum resolution of 720 pixels and a minimum frame rate of 30 FPS. Acceptance, however, isn't the same as optimal presentation.
A wide or square video may upload successfully, but it won't occupy the same full-screen portrait area. Instagram may letterbox, crop, or reframe it depending on where a viewer encounters the Reel. That creates a production problem: the file can be technically valid while the message becomes visually compromised.
Treat the canvas as an entry ticket
A strong workflow checks three layers:
- Canvas compliance. Start with the vertical 9:16 frame and export at the standard dimensions.
- Interface clearance. Keep essential information away from regions where controls, captions, usernames, or navigation elements can overlap.
- Placement resilience. Review the composition as a Reel, a feed preview, a profile cover, and an ad creative if the asset will serve multiple purposes.
The third layer is where many templates fail. A headline centered for the full-screen player may still be cut when the cover appears in a profile grid. A product placed near the bottom may look balanced in an editing timeline but become difficult to see once captions and controls occupy that area.
Practical rule: If a viewer must read, recognize, or tap something, don't place it near an edge just because the raw canvas allows it.
Instagram Reels launched on August 5, 2020, in more than 50 countries, originally supporting 15-second multi-clip videos, according to this documented history of Instagram Reels. The format has evolved quickly, so a workflow built only around its original short-video assumptions will age badly. Use current technical guidance, but design for how people encounter the asset across Instagram's surfaces. For broader trend context, review Hooked's social media trends.
The Standard Reels Specs at a Glance
Correct dimensions are the entry requirement, not the performance target. The spec sheet defines what Instagram can accept, while the production setup determines whether the video stays sharp, readable, and useful after processing and placement changes.
| Spec | Value | Production reason |
|---|---|---|
| Canvas | 1080 × 1920 px | Gives vertical footage enough detail for faces, products, and text without starting with an unnecessarily small master |
| Aspect ratio | 9:16 | Uses the full-screen portrait frame and leaves the composition ready for the primary Reels placement |
| Minimum resolution | 720 px | Meets Instagram's stated minimum for accepted uploads, but provides less room for fine detail after compression |
| Minimum frame rate | 30 FPS | Matches the stated baseline for Reels video and keeps ordinary movement looking natural |
| Accepted aspect range | 1.91:1 to 9:16 | Allows repurposed files to upload, though wider footage gives up portrait space or requires a crop |
| Delivery choice | 30 FPS, unless the treatment calls for another rate | A lower frame rate can support a deliberate stop-motion, staccato, or retro look. Test that treatment in the full publishing workflow before using it |
Instagram's documented guidance, summarized in Buffer's current sizing reference, accepts aspect ratios from 1.91:1 to 9:16, with minimum requirements of 720 pixels and 30 FPS. Treat those figures as platform thresholds, not as the production target. A smaller or slower file may upload successfully while giving compression less detail to preserve.
The practical delivery benchmark is 1080 × 1920 at 9:16, also covered in Postfa.st's Reels size guidance. Other ratios remain useful for repurposing existing footage, especially when the original asset must serve feed or horizontal placements. The trade-off is visible: less portrait real estate, more cropping, or both.
Frame rate should follow the motion design, not a race for the largest export number. Capture at a higher rate when slow motion needs it, then choose the delivery rate deliberately. Exporting every Reel at a higher frame rate does not guarantee a better-looking upload after Instagram processes the file.
Set the sequence to delivery dimensions, inspect type and fine detail at mobile scale, and review a rendered file rather than trusting the editing monitor. A technically correct master still fails if its visual hierarchy collapses on a small portrait screen.
Safe Zones and UI Overlaps You Need to Plan Around
On a 1080 × 1920 canvas, reserve approximately 270 pixels at the top, 672 pixels at the bottom, and 64 pixels on both sides. These clearances, specified in Cadenus's Instagram safe-zone guide, give text, logos, and other UI-sensitive elements room to remain readable.
Use the center corridor for meaning. Headlines, faces, product benefits, prices, and calls to action should not rely on the regions most likely to sit beneath interface controls. Edge space can hold texture, background footage, or decorative graphics. If a viewer must reconstruct a cut-off label or caption, the layout has already failed.
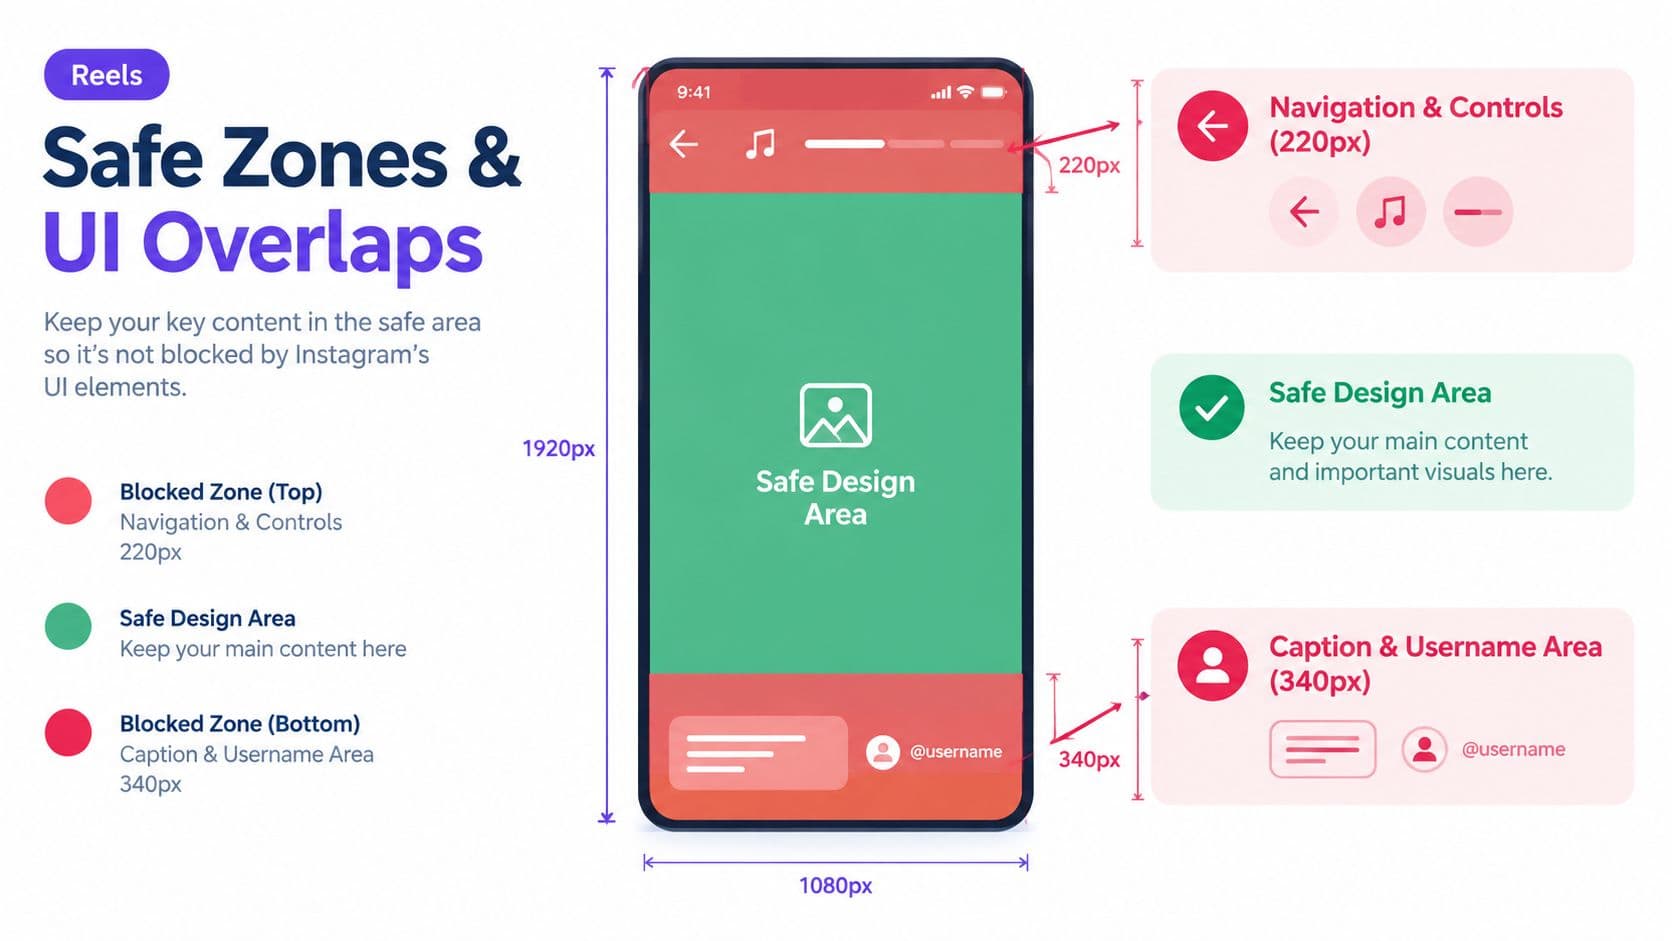
Why placement changes the result
A Reel may appear in the dedicated Reels viewer, the main feed, Explore, a profile grid, or an advertising placement. Those surfaces can apply different crops and surround the same video with different controls. InVideo's Reels size guide highlights the practical gap in format advice: correct dimensions do not guarantee that hooks, captions, logos, or product shots will stay visible.
Check the first seconds in both the full-screen player and a tighter preview. Keep the opening line, subject, product proof, and primary visual inside the central field. A composition that works only in the full-screen view will lose context elsewhere.
Covers require a separate review. The cover comes from the vertical asset, but profile and feed previews can show a different shape. A headline placed near either edge may lose the words that explain it. Build the cover around a centered subject and short, legible text instead of assuming the opening frame will work across every surface.
Visibility beats theoretical canvas space. The usable area is the area viewers can read without interface elements or cropping getting in the way.
Designing Layouts That Stay Visible
Safe zones only help when editors apply them consistently on every frame. Create a reusable 1080 × 1920 template with guides enabled, then lock the guide layer so headlines, logos, product shots, and CTAs are positioned deliberately rather than by eye.
A practical composition can keep important text within a central vertical region, leaving the recommended top and bottom clearance described in Cadenus's technical template. Treat the side margins with the same caution. A headline may be vertically safe but still compete with interface controls if it runs too close to the right edge.
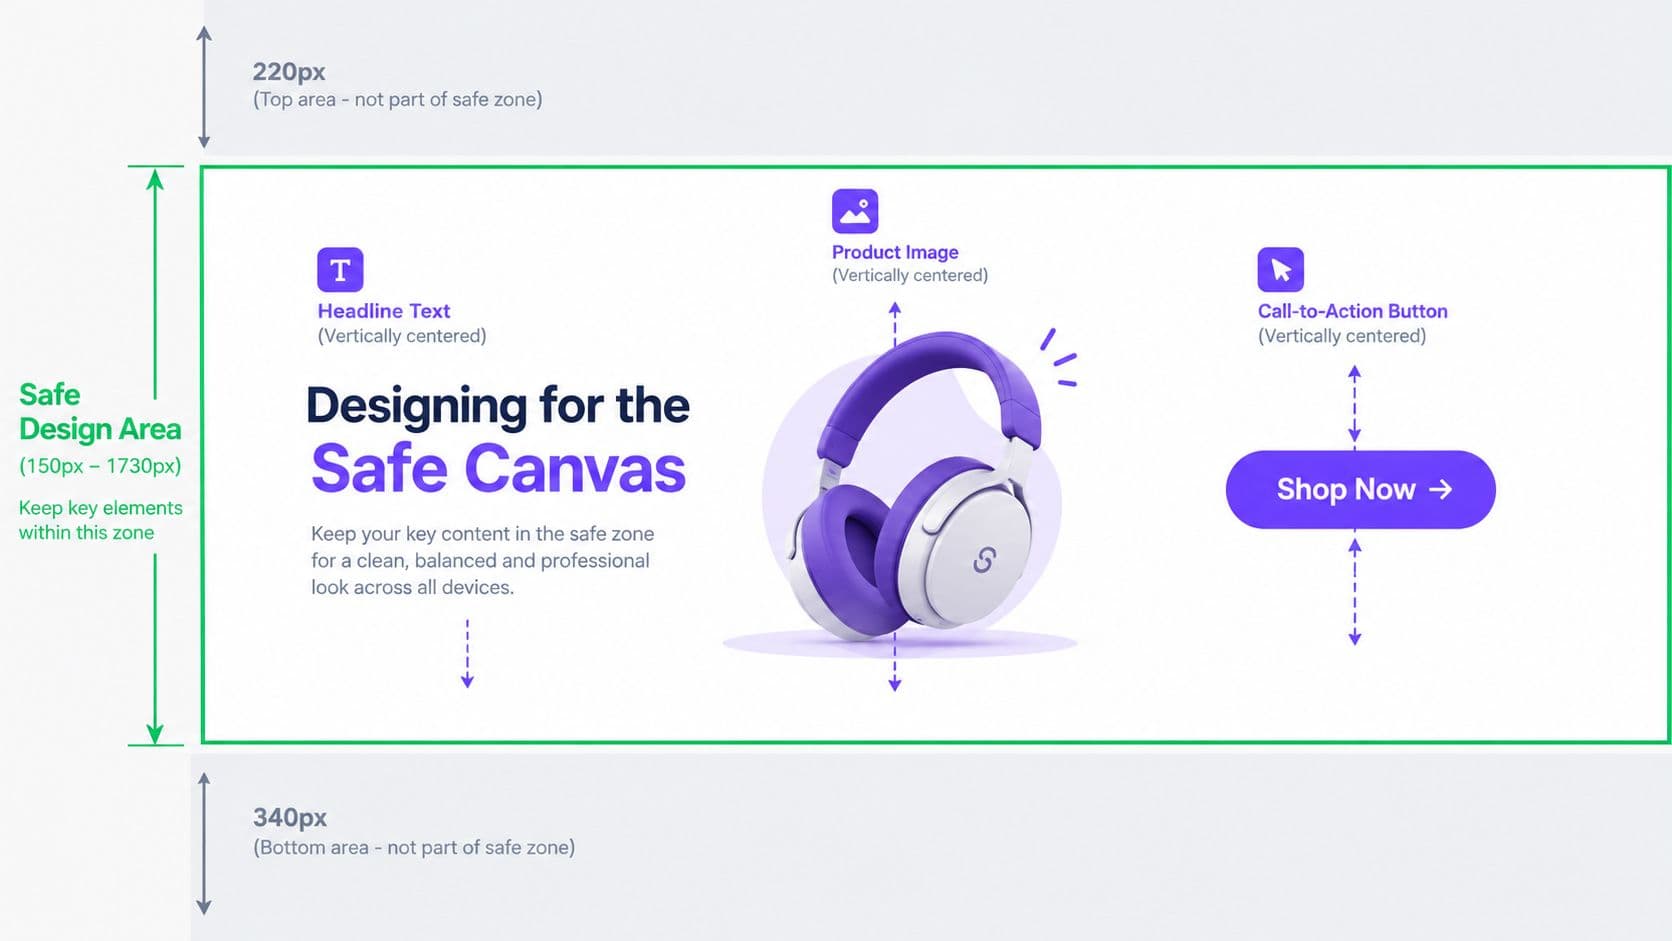
Three layout patterns that hold up
- Text-first Reels: Put the headline in the central field, use strong contrast, and keep each line short enough to scan without competing with the subject.
- Logo-first Reels: Place the mark in a consistent upper corner only after checking the top clearance. A small logo usually works better than a large badge that collides with navigation or distracts from the hook.
- CTA-first Reels: Position the action prompt above the lower interface zone. Make the instruction part of the spoken or visual narrative, not a button stranded at the bottom of the frame.
Use a rule-of-thirds grid for talent and products. A presenter's face or the key product feature can sit near a vertical third, while text occupies the opposing clear area. That creates hierarchy without forcing every element into the exact center.
Review the design at several moments, not just the opening frame. Animated captions can drift into an unsafe area, and an end card often introduces a logo or CTA after the editor has stopped checking the guides. If multiple people edit the account, bake the guides into the project template and document which elements are allowed outside the central area.
For teams producing repeated variations, an AI workflow can reduce manual layout work. Hooked's Instagram Reels generator is one option that creates vertical Reel content with reel-safe text positioning and export formats suited to Instagram.
The final test is simple: watch the Reel on a phone with the app interface visible. If the first hook, product, or CTA needs squinting or mental reconstruction, revise the layout before publishing.
Alternative Aspect Ratios and When to Use Them
A Reel can meet Instagram's upload requirements and still lose impact through the wrong crop. Choose the aspect ratio around the source footage, placement, and planned adaptations, not just the file the platform accepts. The Postfa.st's format reference is useful for checking how each format maps to Instagram placements.
Reels Aspect Ratio Comparison
| Ratio | Resolution | Best Use Case |
|---|---|---|
| 9:16 | 1080 × 1920 | Full-screen Reels, Stories-style vertical creative, and mobile-first campaigns |
| 4:5 | 1080 × 1350 | Feed-focused adaptations where a shorter portrait frame is easier to control |
| 1:1 | 1080 × 1080 | Square-first brand assets or existing social graphics that need minimal reframing |
| 1.91:1 | 1080 × 566 | Landscape footage, trailers, or wide source material where horizontal composition is essential |
A 9:16 master gives you the greatest cropping flexibility. Build 4:5 or square versions from a vertical source only when the subject, product, and copy have enough space around them. A horizontal clip rarely converts cleanly later. Faces can be cut off, important action can disappear, and text may become too large after reframing.
Use 4:5 for a feed-first campaign when the shorter portrait frame makes the composition easier to control. It provides less headroom, so keep faces, products, and captions away from the top and bottom edges during the edit.
Square video works for an existing product graphic or brand layout that already depends on equal margins. In the Reels player, however, it leaves more unused portrait space. Preview the result before publishing, especially when the design relies on large type or a centered product.
The wide 1.91:1 format suits footage whose horizontal composition carries the story, such as a cinematic shot or trailer. It gives up vertical presence, so use it only when preserving that framing matters more than filling the player.
Production rule: Shoot and design for 9:16 first, then create adaptable crops from a master with intentional subject and text placement.
Export Settings for Maximum Quality
Correct dimensions are only the starting point. Instagram re-encodes every upload, so the goal is a clean, correctly sized source that survives compression, text movement, and phone playback. Use a progressive MP4, a stable frame rate, and color settings that match the footage.
For standard Reel delivery, export at 1080 × 1920 and 30 FPS. H.264 remains the safer choice when the same file must pass through Instagram, TikTok, YouTube Shorts, review tools, and scheduling platforms. HEVC can retain quality with smaller files, but software and publishing compatibility varies. Test it through the complete workflow before making it the only master.
A practical export pass
- Codec: Choose H.264 for broad compatibility. Use HEVC only when your export, review, and upload tools handle it reliably.
- Container: Export MP4, with progressive playback enabled when the editor offers that setting.
- Frame rate: Keep the delivery frame rate stable. Avoid variable-rate files from inconsistent screen recordings or mixed-source timelines.
- Color: Match the export to the source. Rec.709 suits SDR delivery, while HDR requires compatible footage and a compatible delivery path.
- Audio: Use a clean AAC track. Check dialogue, music, and effects through a phone speaker before publishing.
Verify the final dimensions and playback in the export panel of Premiere Pro, DaVinci Resolve, CapCut, or Final Cut. “Match Source” can inherit the wrong sequence, proxy, or preview setting if you do not inspect it.
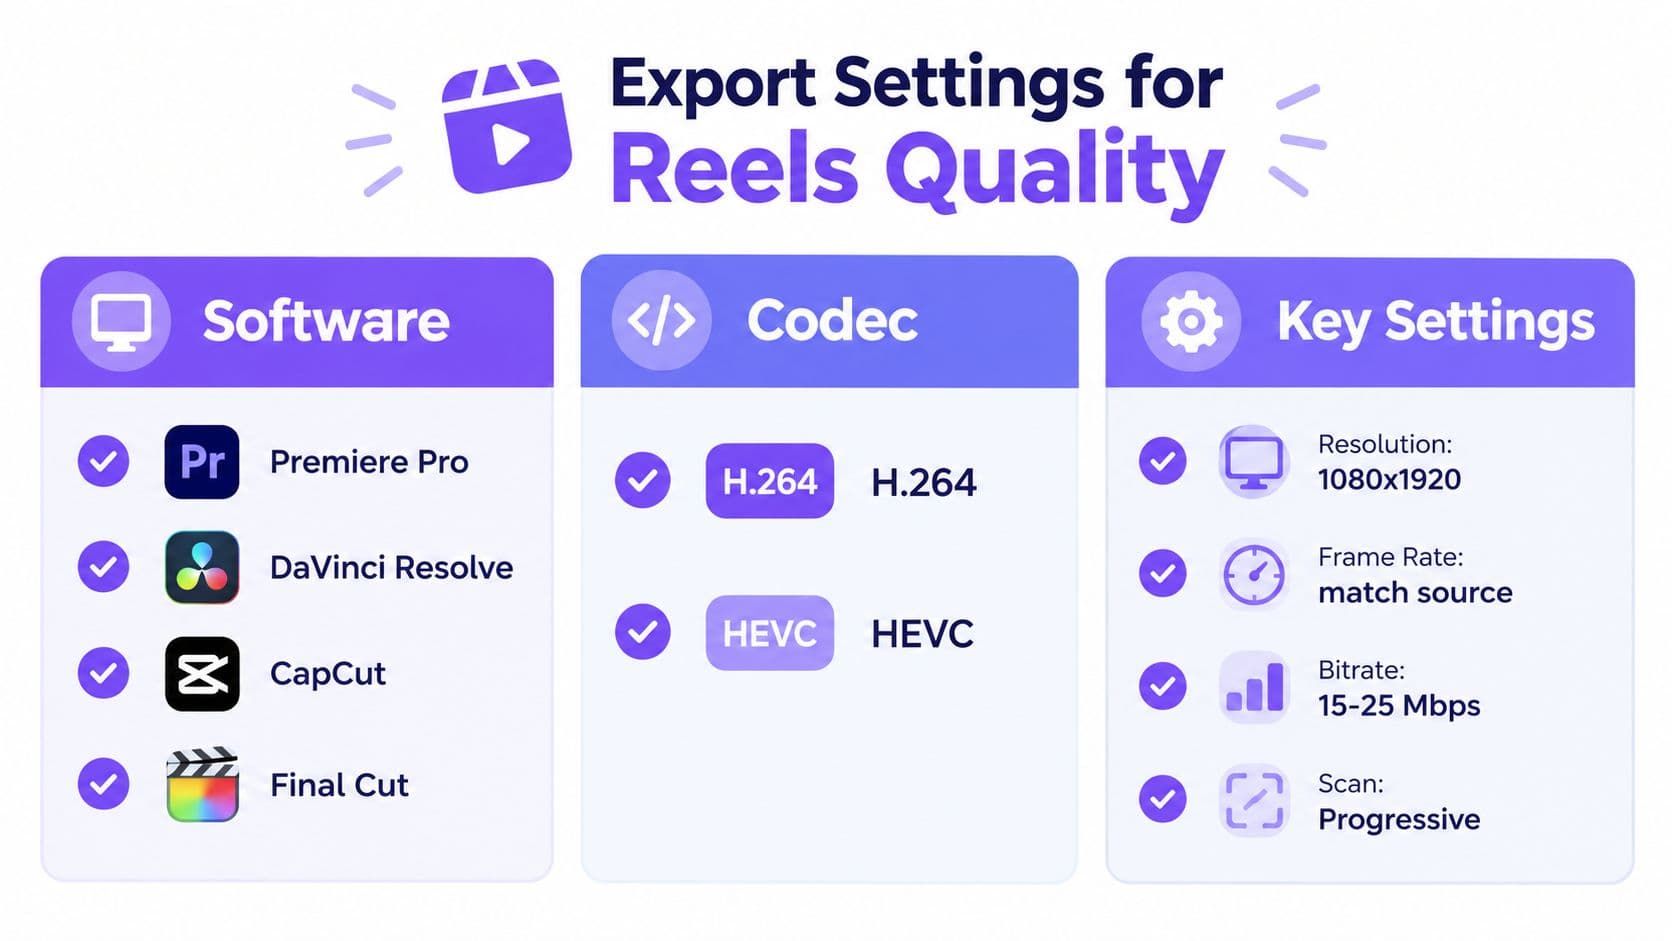
Soft detail, blocky gradients, crushed shadows, and loud mobile audio are the failures viewers notice first. Render a short test for heavy text animation, rapid movement, fine product textures, or HDR footage. Hooked's AI video editor can support teams assembling and adapting vertical edits without rebuilding each version manually.
Duration Limits Versus What Performs
Recent platform updates allow Reels up to 3 minutes for many accounts and up to 15 minutes for select creators. ScreenSnap's Reels size guide identifies 5 to 25 seconds as a strong performance window. Upload limits define eligibility, not the right runtime for every idea.
Choose duration from the information load and the viewer's reason to continue. A trend reaction, visual gag, or single product benefit may need only a compact sequence. A tutorial needs enough time to establish the promise, demonstrate the steps, and deliver the takeaway. A story-led piece needs progression, while extra footage cannot repair a weak opening or repeated information.
Choose length by narrative job
- Short hook: Use a compact duration when one visual or sentence carries the idea. Cut setup that viewers can infer.
- Tutorial: Give each step enough screen time to understand, then remove pauses between actions. Keep the explanation concise without making it rushed.
- Story arc: Maintain forward motion. Once the resolution arrives, later footage often reads as padding.
- Long-form episode: Reserve extended runtimes for interviews, episodic material, or demonstrations that give viewers a clear reason to stay.
Shorter edits often encourage completion and replay, but compressing every Reel into a rapid montage creates its own problem. Viewers accept length when each beat adds information, emotion, proof, or anticipation. They leave when the video repeats its premise, delays the payoff, or spends too long establishing context.
Length is a consequence of the idea, not a target to fill.
Review retention by locating the first meaningful drop, then inspect the frame and action at that moment. A slow opening, obscured caption, confusing crop, or transition that fails to explain the next action can cause the exit. Duration decisions therefore depend on framing and visibility as well as pacing. A Reel can meet the correct format size and still lose viewers when its hook sits behind interface elements or its payoff arrives too late.
Quick Reference Checklist for Every Upload
Use this checklist before an asset leaves the editing queue. It separates decisions that belong in production from checks that only become visible during export or after publishing.
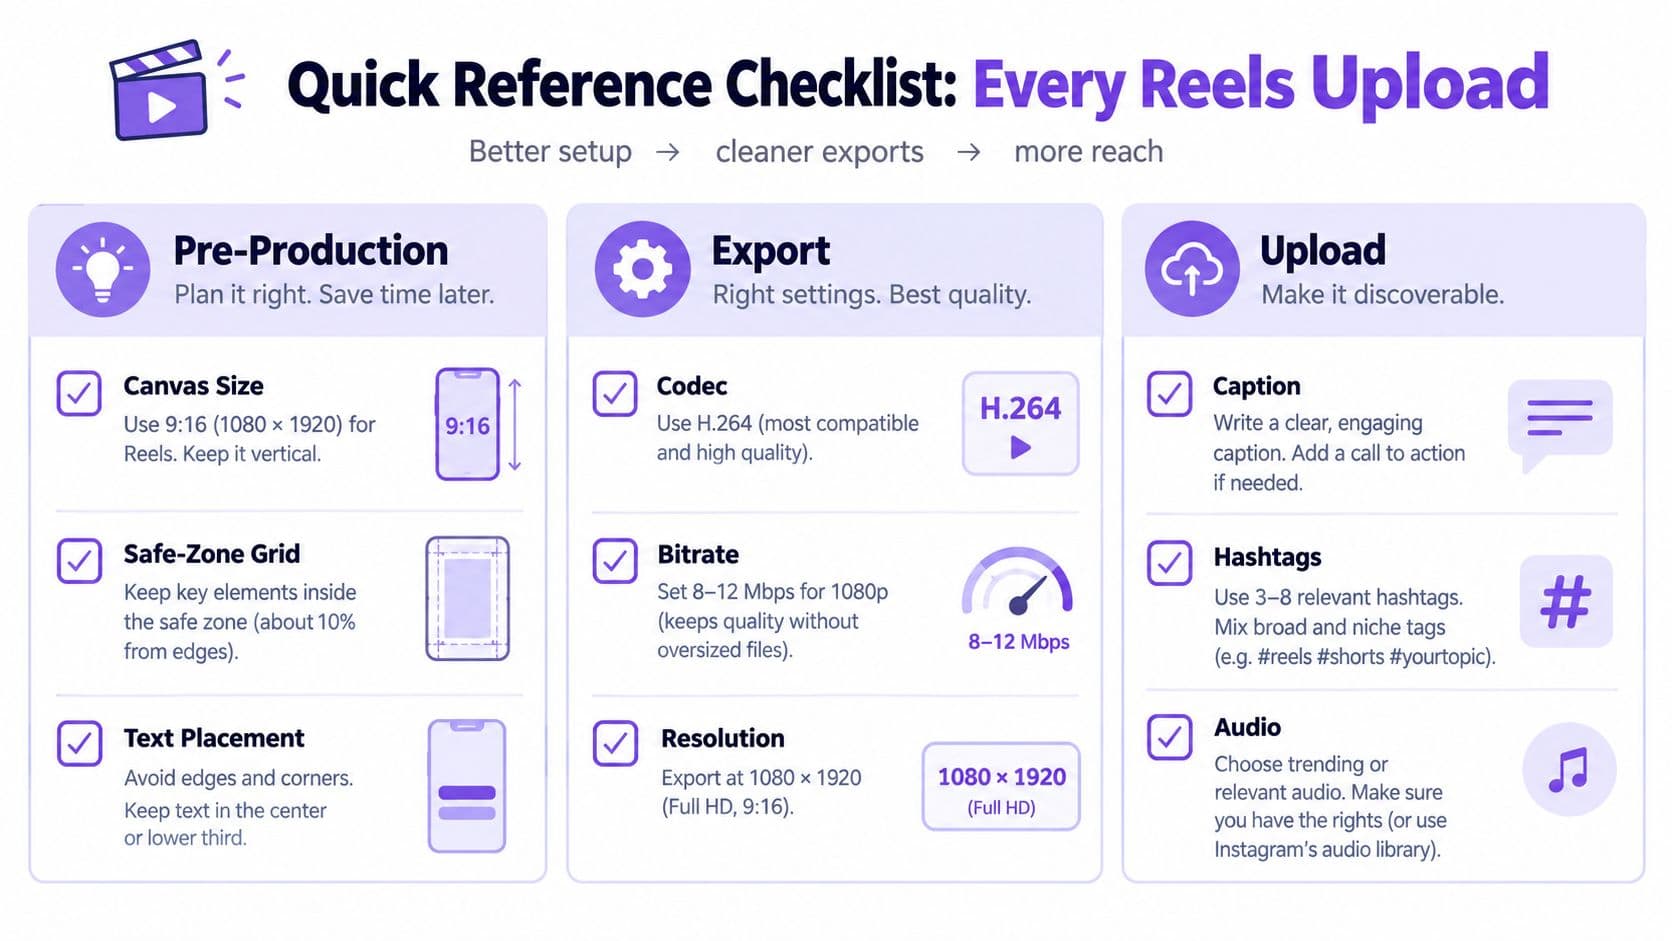
Pre-production
- Canvas: Set the sequence to 1080 × 1920 and 9:16, the standard described in Buffer's Instagram sizing guide.
- Safe guides: Mark the top, bottom, and side clearance before placing copy or logos.
- Opening frame: Make the first visual understandable without relying on a caption that may sit under interface elements.
- Text placement: Keep the headline, subtitles, prices, and key claims inside the central readable field.
- Subject framing: Leave room for portrait crops and avoid placing faces or products against the extreme edges.
- CTA position: Put the action prompt above the lower interface area and check it against the full-screen player.
- Cover frame: Choose a cover with a centered subject and readable text that survives a tighter profile preview.
Export
- Resolution: Confirm the final file is 1080 × 1920, not a proxy or a smaller review render.
- Frame rate: Use at least 30 FPS, the minimum identified in Instagram's referenced upload guidance.
- Codec: Select H.264 for the safest cross-platform handoff, or HEVC only after testing compatibility.
- Color: Match the export color space to the source and inspect skin tones, whites, and brand colors on a phone.
- Audio: Check dialogue intelligibility, music balance, and clipping on mobile playback.
- Playback: Scrub the exported file from beginning to end before uploading. Look for missing captions, shifted overlays, and broken transitions.
Upload and review
- Preview surfaces: Check the Reel in the full-screen player, feed preview, profile cover, and any planned ad placement.
- Caption clearance: Verify that lower-third text isn't hidden by the caption and username area.
- Thumbnail text: Keep the cover message brief enough to remain legible at a small size.
- Accessibility: Add accurate alt text where available and make spoken information understandable through captions.
- Audio rights: Confirm that the selected music or voice track is cleared for the intended account and campaign.
- Final quality: Don't upload a file that has already been repeatedly downloaded, compressed, or exported from a low-resolution proxy.
The essential standard is simple: 1080 × 1920 at 9:16 is the baseline, not the finish line. A professional Reel keeps its important information visible, survives placement changes, and uses a duration that serves the idea rather than the upload limit.
Hooked helps creators and brands turn trend insights into vertical videos with reel-safe text positioning, AI-generated scripts, editing tools, and publishing workflows across major social platforms. Visit Hooked to build reusable Reels assets that start with the correct canvas and stay readable through the final upload.